Table of Contents
You want great hair days without crispy ends. You’re here to prevent heat damage hair and still rock smooth blowouts, sleek shine, or soft curls. Good news: you can. With the right prep, temps, and techniques, you’ll keep your strands glossy while your tools do their job.
Prevent Heat Damage Hair: Quick Wins You Can Use Today
- Drop the temp. Start low, raise only if needed. Your hair isn’t a steak.
- Use heat protectant on damp or dry hair (check the label), then comb it through for even coverage.
- One pass mindset. If you need more than two passes with a flat iron, the section is too big or the temp is too low.
- Section small. Smaller sections = faster, cleaner results with less exposure.
- Keep it moving. Don’t park a hot tool in one spot.
- Cool shot counts. Finish blow-dries with a blast of cool air to set shape and add shine.
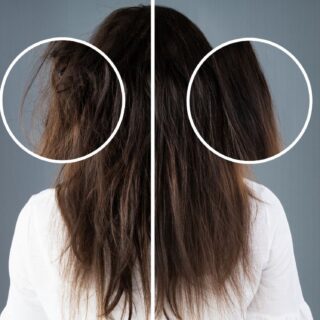
What “Heat Damage” Actually Looks Like
You’ll notice a few tells: rough feel that lasts after washing, ends that won’t hold moisture, breakage when brushing, frizz that doesn’t smooth, color fading fast, and curls or waves that won’t bounce back. If that sounds familiar, it’s time to tweak your routine.
Your Heat Prep Routine (The Part That Saves Your Ends)
1) Cleanse smart. Aim for a balanced wash day. Heavy buildup blocks heat protectant and traps heat on the cuticle.
2) Condition with slip. You want detangling and light moisture so the brush and tools glide.
3) Blot, don’t rub. Microfiber towel or cotton T-shirt. Rubbing roughs up the cuticle.
4) Detangle in sections. Start at the ends, then work up.
5) Heat protectant, every time. Fine hair usually prefers lightweight sprays or milky leave-ins; thick and coily hair often loves creams or serums. Apply root-to-tip, comb through for even coverage, and don’t forget baby hairs and nape.
6) Pre-dry to ~70–80%. If you’re blow-drying, air-dry or diffuse first to cut tool time. Less time under heat = happier strands.
The Right Temperatures (So You Don’t Cook Your Style)
There’s no single “perfect” number, but a simple rule works: start low and step up in small bumps only if needed.
- Fine or fragile hair: lower temps and fewer passes.
- Medium hair: moderate temps, steady movement.
- Coarse or resistant hair: slightly higher temps, but still keep sections small and the iron moving.
If you’re not getting results at low heat, don’t jump 100°. Nudge up a little and test a tiny section.
Safe Heat Styling: Your Step-by-Step Routines
Blow-Dry Routine (smooth, fast, and gentle)
- Prep: Apply protectant and a lightweight styling aid for slip.
- Air-dry to 70–80%.
- Nozzle on. A concentrator focuses airflow and keeps heat from blasting everywhere.
- Brush choice: Round brush for bend/volume; paddle for sleek.
- Angle and distance: Keep the dryer moving with airflow pointing down the hair shaft.
- Tension + travel: Smooth, steady tension as you move from roots to ends—no yanking.
- Cool shot: Seal it. It sets shape and adds shine without more heat time.
Flat Iron Routine (sleek without the singe)
- Completely dry hair. If you see wispy vapor, make sure it’s product evaporating, not smoke.
- Comb-chase method: Run a fine-tooth comb ahead of the iron. It lines up strands so you can get results in one pass.
- Section thin. If you can’t see through the section, it’s too thick.
- Slow, steady glide: Don’t clamp hard; don’t stall.
- Edges and hairline: Dial the temp down a notch and work smaller sections.
Curling/Waving Routine (soft curls that still feel like hair)
- Dry hair + protectant.
- Section clean. Clip the rest out of the way.
- Wrap, don’t bake: Hold each curl for the shortest time that sets the shape.
- Pin to cool if you want lasting hold. Cooling locks in the pattern—no extra heat needed.
- Break the cast with fingers or a soft brush once fully cool.
Pass Count, Timing, and Section Size
- Blow-dry: small sections, steady passes until dry—don’t “over-dry.”
- Flat iron: aim for one pass. Two if needed on resistant sections.
- Curler/waver: shorter holds with consistent timing per section.
If you’re tempted to keep going, stop and ask: “Is this a heat problem or a prep problem?” Most of the time, it’s prep, not power.
Product Layering That Actually Helps
- Leave-in + protectant: Stack light layers; avoid a heavy, greasy coat that fries.
- Hold product after heat, not before (except light blow-dry creams). Spritz hairspray on your brush and skim if you need extra control with less buildup.
Tool Habits That Protect Your Hair
- Clean plates and barrels. Gunk sticks, snags, and overheats.
- Check hot spots. If one area always sizzles, your tool might be too hot or uneven.
- Mind the edges. The hairline and ends are the oldest, so go lighter there.
- Use attachments. Diffusers for curls, concentrators for sleek—less chaos, more control, less heat time.
“Steam = Damage” (and other myths to stop believing)
A little vapor can be moisture or product flashing off. What you don’t want is smoke, a scorched smell, or a crackling sound. Those are your cues to pause, wipe the plates, lower the temp, or rework your prep.
Weekly Care That Buys You Heat Room
- Moisture mask once a week. Think slip and hydration.
- Bond-building or protein, sparingly. Great as a reset if hair feels stretchy or fried, but keep it balanced with moisture.
- Trim on a schedule. Nipping ends before they shred keeps the whole strand happier.
- Clarify when needed. A gentle reset clears residue so your protectant can actually touch hair, not buildup.
How Often Can You Use Heat?
Think of your hair like a budget. Every pass “spends” a little. You can style more often if you:
- keep temps lower,
- shorten tool time,
- nail your prep, and
- rotate in heat-free days (rollers, braids, flexi-rods, or an overnight twist set).
If you color or bleach, your budget is smaller—treat heat as a special occasion or dial it way down.
Safe Heat Styling for Every Hair Type
Fine/straight: Low temps, ultra-thin sections, light products. Your hair heats up fast—less is more.
Wavy: Boost definition with a diffuser and a curl cream. For irons, quick wraps and gentle holds.
Curly: Diffuse on low with a leave-in + gel combo. If you stretch curls, use low, even heat and tension (no yanking).
Coily: Work in small sections, use rich leave-ins, detangle fully, and keep tension consistent. A warm, steady pass beats a hot, harsh blast.
Signs You Need a Heat Reset
- Ends that snap when brushed
- Hair that stays frizzy after smoothing
- Pads of your fingers feel roughness after a wash
- Your curl pattern won’t spring back
Hit pause, focus on moisture + bonds for a couple of weeks, trim if needed, and ease back in with low temps and tight sections.
Your 10-Point Heat Safety Checklist
- Wash away buildup before big heat days
- Condition for slip
- Blot, don’t rub
- Detangle small sections
- Heat protectant, combed through
- Pre-dry before blow-drying
- Start low on temps
- Small sections, steady passes
- Cool shot to set
- Weekly moisture + regular trims
FAQs
Can you skip heat protectant if your tool is “gentle”?
No. Even “gentle” tools are still hot. A protectant is your seatbelt.
Why does my hair smoke at the ends?
Likely product build-up or too much oil. Clarify, lighten your layers, clean your tool, and lower the temp.
My curls fall unless I crank the heat. Now what?
Try smaller sections, a little more pre-dry time, pin curls to cool, and finish with a light mist of flexible-hold spray after styling—no need to roast your hair.
Do I need different temps for roots vs ends?
Usually, yes. Roots can handle a bit more because they’re newer; ends are older, so be gentler there.
You don’t have to choose between healthy hair and hot tools. With smart prep, sane temps, and safe heat styling routines, you’ll get the finish you want without the fallout. Save the checklist, tweak your setup, and your next style will feel as good as it looks.